As I had mentioned in a previous post, there were a bunch of new rares that were going to be added in patch 5.1. Well the patch is here, and so are they! I've spent a lot of time over the past week camping these rare faction champions, and I figured I'd share some of the information I've learned.
First of all unless you've completed the initial couple of quests (starting with
A King Among Men/
The Might of the Warchief) at your faction's base camp you will not be able to see these rares. Completing those initial quests and their follow-ups will toss you into a new phase that will change your zone map significantly and allow you to see both the Horde and Alliance base camps: Lion's Landing and Domination Point.
Each base has three rares, for a total of six rare champions in the zone (of course you'll only be able to attack three of them, as your own faction rares will appear friendly to you). There are three different types of rares: the warrior, rogue and healy-type. Each base has one of each type. When you've killed all three champions in your enemies base, you will be awarded the achievement
I'm in Your Base, Killing Your Dudes. (Origin:
In Ur Base.)
Each rare has one piece of loot unique to them, and the rest are shared. The shared loot that you could possibly get from them (in order of most likely - least likely) is:
- around 10
Domination Point Commitions (Alliance)/
Lion's Landing Commitions (Horde)
-
Honorable Commendation of Operation: Shieldwall (Alliance)/
Honorable Commendation of the Dominance Offensive (Horde)
-
Small Bag of Goods (Both Factions)
- and the reason why these guys are so highly camped:
Blood-Soaked Invitation (This item will grant you access to your faction's Brawler's Guild.)
These rares also grant +400 reputation with
The Black Prince up to Revered.
The Commendations are by far the most common drop. Let's just say I've gotten a LOT of honor over the past few days. I now have each of the trinkets and have seen a couple of them more than once. I have yet to see the Blood-Soaked Invitation, or know of anyone who has received it. If you don't want to spend incredible amounts of gold on the Black Market Auction House though this is the only means of acquiring it at this point.
Spawn timers on these rares are very fast. The longest spawn I've seen was about an hour, but I've also seen them respawn in as little as a half hour.
(For Alliance Players) Horde Champions at Domination Point: Champion of Arms: Kar WarmakerAbilities:
-
Heroic Leap/
Heroic Leap He will use this if your over 15 yards away, it will knock out 40% of your health. Don't get to far from him!
-
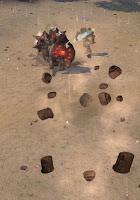
Cracking Blow (pictured left) This is the killer right here. This ability he smashes straight in front if him, and it will cost you 60% of your max health if hit. The best way to avoid this is to run right through him as fast as possible or try to sidestep it.
-
Sunder Armor self-explanatory
Loot unique to Kar: Steadfast Footman's MedallionChampion of the Light: MuertaAbilities:
-
Chains of Faith This is a 6 second stun. Save your interrupts for this.
-
Holy Bolt She will cast this continuously. Nothing to worry about really.
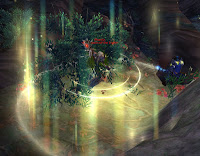
- Wrath of Light (pictured left) She casts this under her target. Move out of this as quickly as possible. When she finishes her cast it will hit for over 200k dmg.
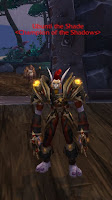
Loot unique to Muerta: Alliance Insignia of Conquering.Champion of the Shadows: Ubunti the ShadeAbilities:
- Mortal Throw He will use this ranged attack if you are further than 15 yards from him. It will take out 60% of your max health. Just try to stay up close and personal with him.
-
Shadowblink He will occasionally disappear and reappear several yards away. Sometimes it will be far enough where he will try to use Mortal Throw. Run toward him as fast as possible and he will not complete the throw.
-
Shank 1.5 second cast followed by a 3 second stun. He'll only use it in melee range. It is possible to avoid this by stepping away when he starts to cast this.
Loot unique to Ubunti: SI:7 Operative's Manual
NPCScan will pick up each of these rares, at this time you simply need to add them. Just copy and paste:
/npcscan add 68321 Kar Warmaker
/npcscan add 68322 Muerta
/npcscan add 68320 Ubunti the Shade
(Because of their very fast respawn times, if you don't want to log out and clear your cache a simple targeting macro will do the trick as well.)
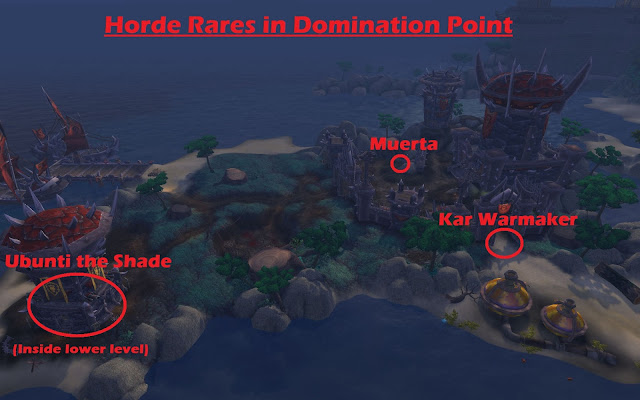
I've taken a screenshot, and circled where each of these rares can be found in Domination Point. I figured this would be easier than a map to point them out. Kar Warmaker spawns right in the middle of the main entryway into Domination Point. Muerta spawns a little further in right in front of a bunch of crates near a giant tree stump. (I recommend pulling her toward the stump to avoid Or'Dac, the quest npc that patrols right near her.) Ubunti the Shade spawns at the bottom of the tower. (Be aware that horde players can hire elites to protect the tower, making the fight with him even more interesting.)
![]() |
| Click Photo to Enlarge |
(For Horde Players) Alliance Champions in Lion's Landing:Champion of Arms: Dalan NightbreakerAbilities:
-
Heroic Leap/
Heroic Leap He will use this if your over 15 yards away, it will knock out 40% of your health. Don't get to far from him!
-
Cracking Blow (pictured left) This is the killer right here. This ability he smashes straight in front if him, and it will cost you 60% of your max health if hit. The best way to avoid this is to run right through him as fast as possible or try to sidestep it.
-
Sunder Armor self-explanatory
Loot unique to Dalan: Mark of the Hardened GruntChampion of the Light: Disha FearwardenAbilities:
-
Chains of Faith This is a 6 second stun. Save your interrupts for this.
-
Holy Bolt She will cast this continuously. Nothing to worry about really.
- Wrath of Light (pictured left) She casts this under her target. Move out of this as quickly as possible. When she finishes her cast it will hit for over 200k dmg.
Loot Unique to Disha: Horde Insignia of ConqueringChampion of the Shadows: Marvis HarmsAbilities:
- Mortal Throw She will use this ranged attack if you are further than 15 yards from her. It will take out 60% of your max health. Just try to stay up close and personal.
-
Shadowblink She will occasionally disappear and reappear several yards away. Sometimes it will be far enough where she will try to use Mortal Throw. Run toward her as fast as possible and she will not complete the throw.
-
Shank 1.5 second cast followed by a 3 second stun. She'll only use it in melee range. It is possible to avoid this by stepping away when she starts to cast this.
Loot unique to Marvis: Kor'kron Book of HurtingNPCScan will pick up each of these rares, at this time you simply need to add them. Just copy and paste:
/npcscan add 68318 Dalan Nightbreaker
/npcscan add 68319 Disha Fearwarden
/npcscan add 68317 Mavis Harms
(Because of their very fast respawn times, if you don't want to log out and clear your cache a simple targeting macro will do the trick as well.)
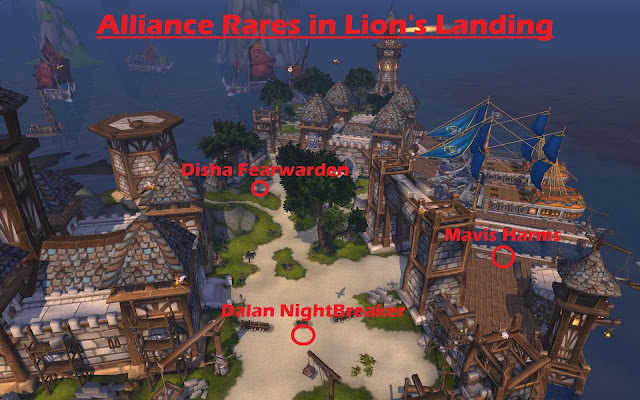
Again, I've taken a screenshot and have circled the exact locations where these rares can be found. Dalan Nightbreaker stands just in front of the barricade leading into Lion's Landing. (I've seen many people pull him toward the main keep near the wall to avoid adds.) Disha Fearwarden stands under the leftmost tent further into the courtyard. Marvis Harms can be found on the docks hanging out with a black cat.
![]() |
| Click Photo to Enlarge |
I do advise bringing a friend to camp for these guys, as they can be pretty tough. They are soloable however (with some classes naturally easier than others - here's looking at you hunters.) The trick really is to avoid their special abilities.
Good luck and Happy camping to all that hope to get a Blood-Soaked Invitation!